Difficulty
Moderate
Steps
16
Time Required
- 10. Final adjustments 16 steps

In Progress
This guide is currently being written. Reload periodically to see the latest changes.

Private
This guide will not appear in search results and can only be viewed by team members!
Quiz
0
-
-
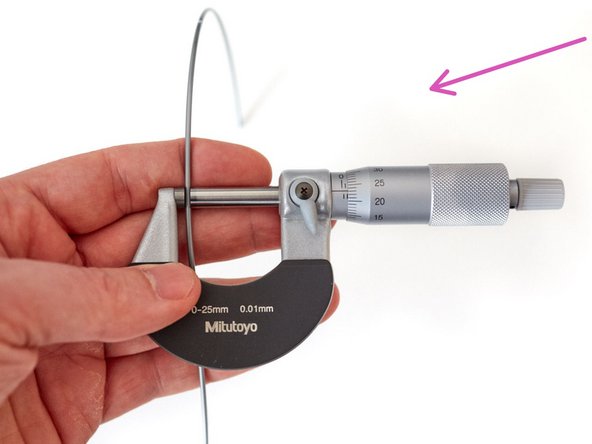
calibration
-
Useful links
-
-
-
Prepare the following parts:
-
4x y_end_caps
-
8x M4x5 set screws
-
Engage 2x M4x5 grub screw into each y_end_caps on the side of the 2 holes until they are flushed.
-
Sometimes, screwing those grub screws are making a weird "kuiiiick" noise. Put the shorter side of the hex key to reduce this.
-
Place each y_end_caps in the 4 bottom corners. Make sure you orientate them correctly: the single mounting point must be on top.
-
Finish to tighten the 8 grub screws.
-
-
-
Prepare the following parts:
-
2x z_end_caps
-
4x M4x5 grub screws
-
Engage 2x M4x5 grub screws into each z_end_caps until they are flushed.
-
Install the z_end_caps on top of the Z axis. Make sure you orientate them correctly
-
Finish to tighten the 4x grub screws.
-
-
-
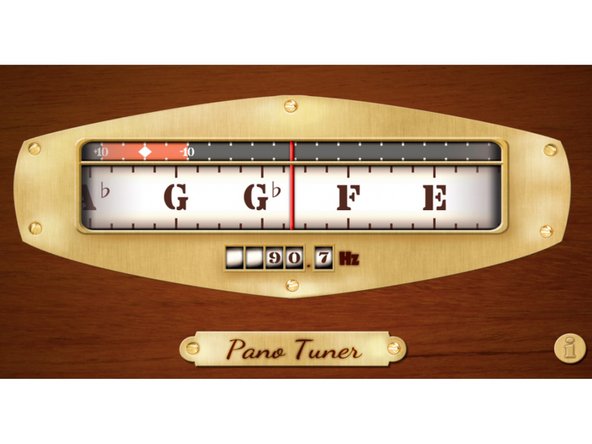
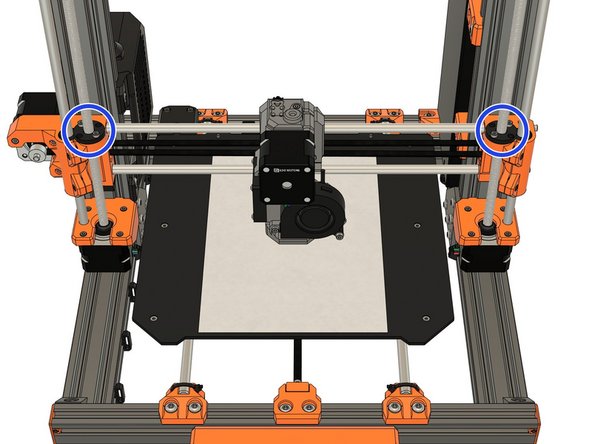
We are going to set the Y axis belt tension now.
-
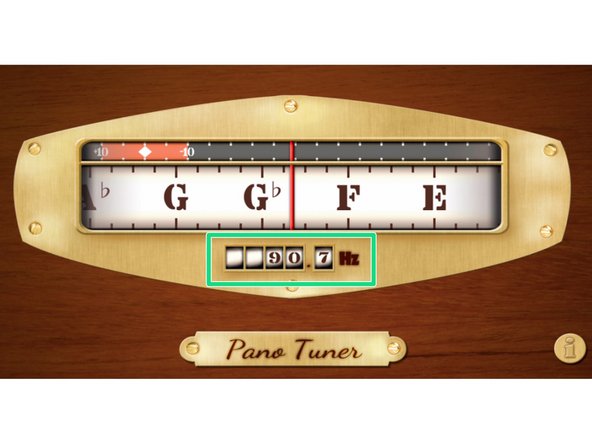
To set Y belt tension finely we will make it vibrate and then tune the noise to a certain frequency, just like with a guitar. To do that we will use a smartphone application.
-
Download and install the Pano Tuner application (developed by Kaleloft LLC) on your smartphone.
-
-
-
Launch the Pano Tuner app and place your smartphone under the heated bed. Make sure there is no noise in the room that could disrupt the measurement (like a ceiling fan).
-
-
-
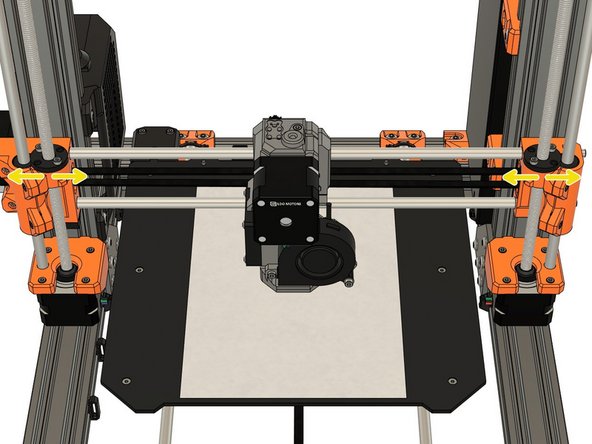
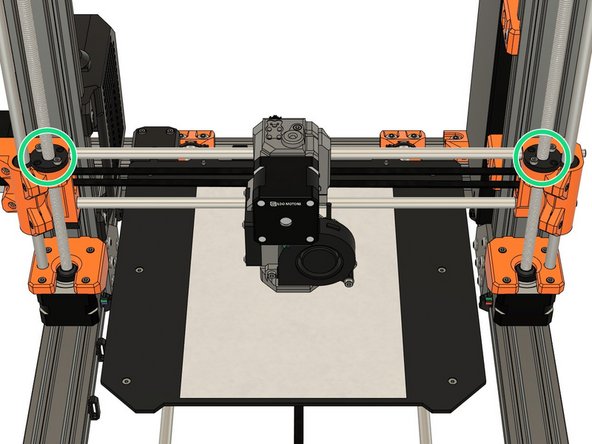
Move the Y carriage to the middle of the Y axis.
-
Pinch the lower portion of the belt to make it vibrate. Don't pinch it too much as it might touch the y_belt_holder and produce a wrong frequency.
-
Adjust the belt tension until you have a value around 90Hz (for standard 6mm belt). Between each adjustments, move the heatbed along the whole Y axis and then center it again.
-
It is very important to move the heatbed between each measurements to relax some tension in the belt.
-
If you are using our optional part for 9mm belt, you then need to adjust the frequency to 80Hz.
-
If your belt is new, you can repeat this procedure after a few prints. A new belt will loosen in the first hours of use.
-
-
-
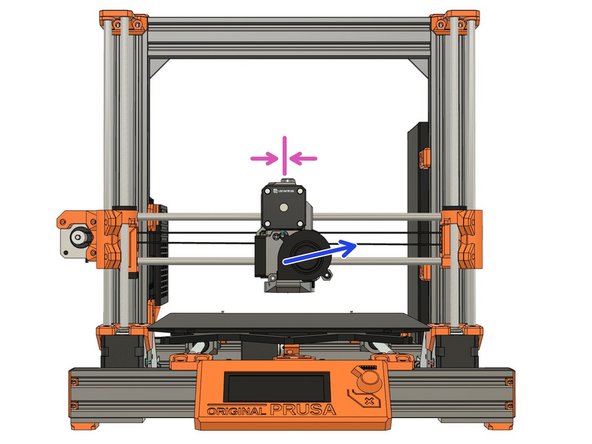
Note that in some steps here we are showing a BearExxa (Bear X axis and extruder). The steps are the same for Prusa extruder or Bondtech extruder.
-
Remove the steel sheet and place a sheet of paper on your heated bed (for protection). Remove any residual filament from the nozzle.
-
Center your extruder on the X axis. Move it down by rotating both the Z lead screws at the same time. Move the extruder down until the nozzle is just touching the paper.
-
Make sure the X axis is flat. You can move the extruder left and right and compare the distance with the heated bed.
-
Stop when the nozzle is just touching the paper.
-
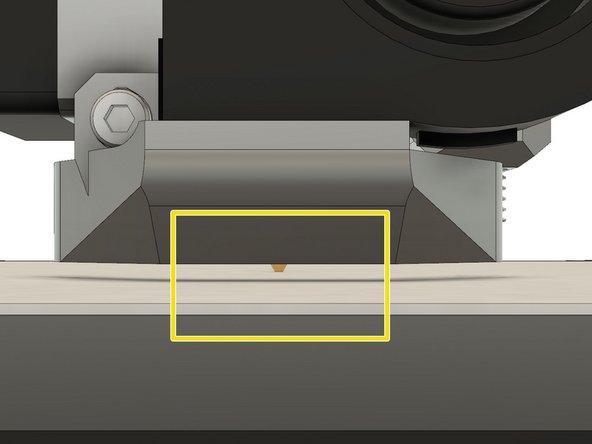
Place the middle section of a zip tie under the Pinda.
-
Loosen the M3x10 screw and gently move the PINDA down until it is touching the zip tie.
-
Tighten the M3x10 screw to secure the PINDA in place.
-
-
-
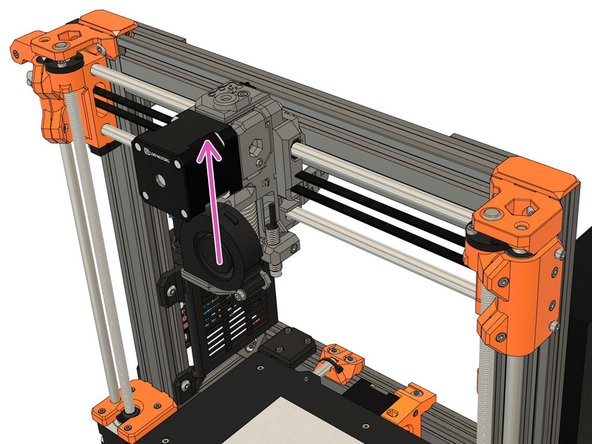
Plugin and turn on the printer.
-
Using the screen menu, move the X axis up until it crashes in to the Z tops. The stepper motors will skip, making a noise - this will not damage the motors.
-
If your printer can't reach Z top, unplug the printer and plug it back. You can now reach Z tops.
-
Using the screen menu, move the X axis down until the nozzle is approximately 10-15mm from the heated bed.
-
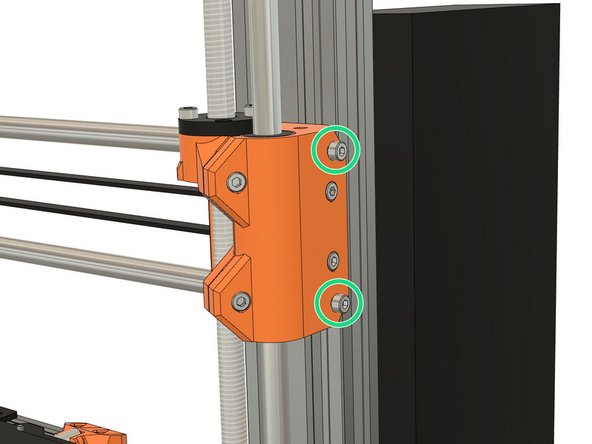
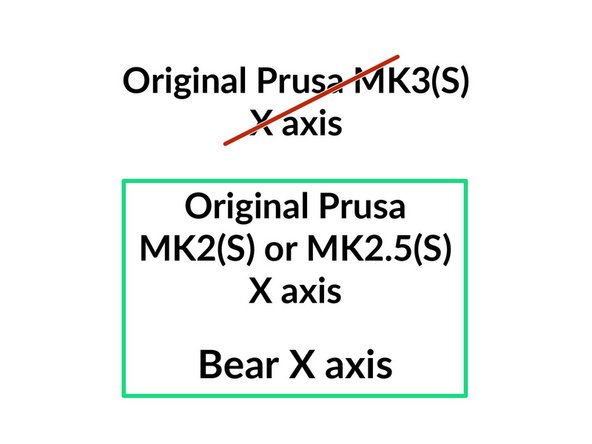
If you are using the Bear X axis (BearExxa, BearMera, Bondtech on Bear X axis) or Original Prusa MK2(S)/MK2.5(S) X axis you need to release the tension on the X smooth rods by unscrewing few turns.
-
-
-
Turn off the printer and center the extruder.
-
Relax the tension of the X axis belt. Refer to the manual of your extruder in case you don't know how to proceed.
-
Loosen the screws which secure the trapezoidal nuts. This is to ensure that the Trapezoidal nuts 'self-centre' on the lead screws.
-
Make sure the trapezoidal nuts are moving freely.
-
Alternate between all 4 screws evenly while tightening (alternate between both sides during the process). Don't apply any lateral force on the trapezoidal nuts.
-
-
-
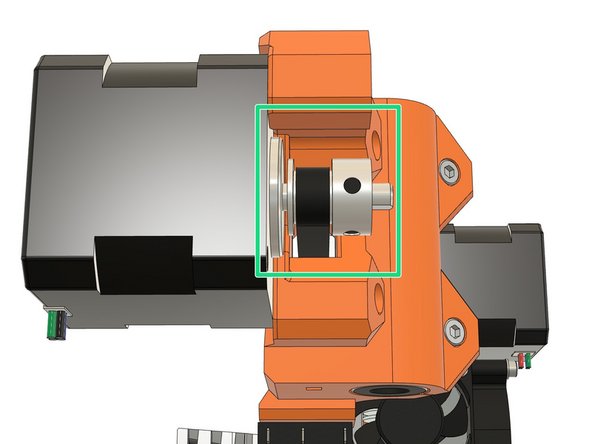
Verify that your X axis pulley is correctly aligned and not touching the X motor.
-
The belt tensioner location vary depending the X axis you are using.
-
Bear X axis (BearExxa, BearMera, Bondtech on Bear X axis): tensioner is on the right of the X axis (X end idler).
-
Original Prusa MK3(S) X axis: tensioner is on the X motor arm.
-
Original Prusa MK2(S)/MK2.5(S) X axis: there is no tensioner, you can only adjust the tension with the belt on the back of the extruder.
-
Grip the X motor shaft with pliers to prevent it rotating (grab the flat side of the shaft).
-
Tension the X axis belt. Do this while trying to move the extruder to the left or right. The belt should stay straight and should not bow up and skip over the drive pulley teeth.
-
No need to be very precise with the belt tension here as the final tension will be improved later (unless you have MK2(S)/MK2.5(S) X axis).
-
-
-
The next step is only if you use the Bear X axis or the Original Prusa MK2(S)/MK2.5(S) X axis.
-
Bear X axis includes: BearExxa, BearMera and Bondtech extruder on Bear X axis.
-
If you are using the Original Prusa MK3(S) X axis go to directly to step 12.
-
-
-
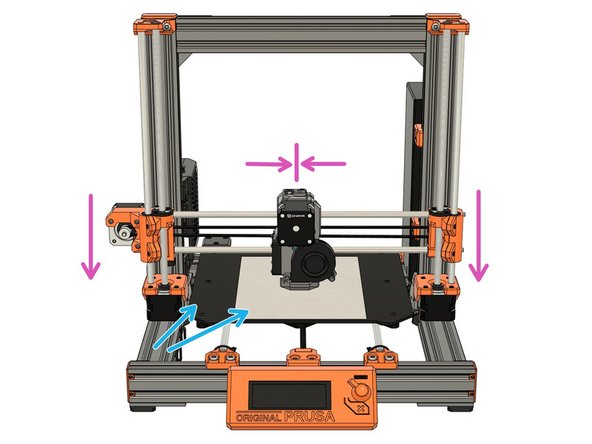
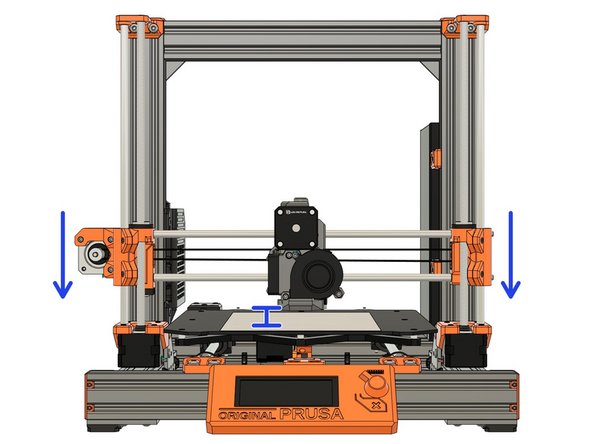
Not all X axis have the exact same length because of tolerances (including on Original Prusa printers). This step will adjust your X axis length.
-
The 1st image shows what happens when you tension the X axis belt. We want to have the X ends as parallel as possible to the frame (or it will affect the X belt motion).
-
1st image, top left: when the X axis is too short.
-
1st image, bottom left: when X axis is too long.
-
1st image, right: when the X axis has the perfect length.
-
To adjust the length of the X axis we need to use the two M3x10 screws of the x_en_idler and look at the Z tops.
-
While you tighten the M3x10 screws keep an eye on the Z tops. The M3x10 screws will move the Z leadscrews laterally (left or right), adjust them to have the Z leadscrews as as possible centered.
-
Note that the M3x10 screws will not move back and forth the Z lead screw position, only laterally.
-
-
-
This step is for all type of X axis. However, the refinement on original Prusa axis might not be very efficient.
-
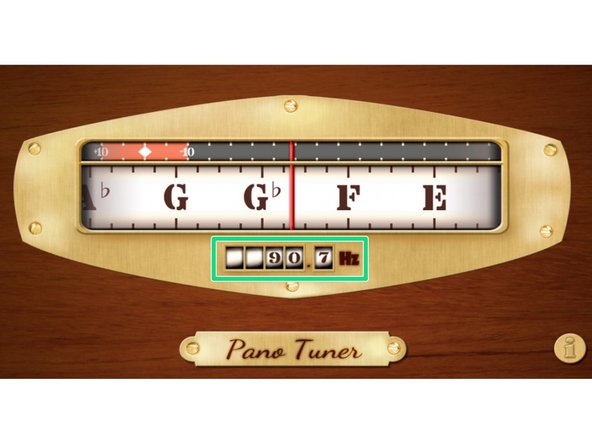
Launch again the Pano Tuner app and place your smartphone on the heated bed. Make sure there is no noise in the room that could disrupt the measurement (like a ceiling fan).
-
Move the extruder to the middle of the X axis.
-
Pinch the lower belt to make it vibrate. Don't pinch it too much as it might touch the carriage and produce a wrong frequency
-
Adjust the belt tension until you have a value around 90Hz. Between each adjustment, move the extruder to all the way to the left and right and then center it again.
-
It is very important to move left and right the extruder between each measurement to relax some tension in the belt.
-
If your belt is new, you can repeat this procedure after a few prints. A new belt will loosen in the first hours of use.
-
-
-
We recommend to flash the latest firmware to get latest fixes.
-
The Bear frame is compatible with stock Prusa firmware if you use an Original Prusa extruder. If you are using an alternative extruder, please follow the recommended firmware:
-
BearExxa needs a custom firmware for calibration: read the guide here.
-
BearMera can use the Original Prusa firmware (or Bear calibration firmware) with some restrictions: read more in details here.
-
Bondtech extruder on stock X axis or Bear X axis needs a custom firmware: you can download it here.
-
If you don't know how to flash the firmware to your original Prusa, check this guide: https://help.prusa3d.com/en/guide/upgrad...
-
-
-
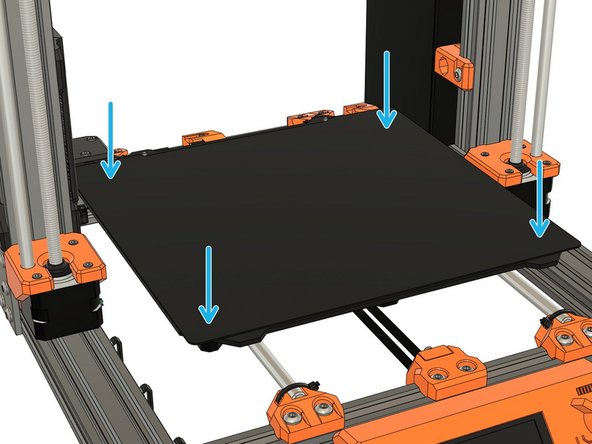
Put in place the steel sheet if you are running MK2.5(S) or MK3(S).
-
Verify that the heated bed is clean.
-
For MK2.5(S) and MK3(S), verify that nothing is between steel sheet and heated bed.
-
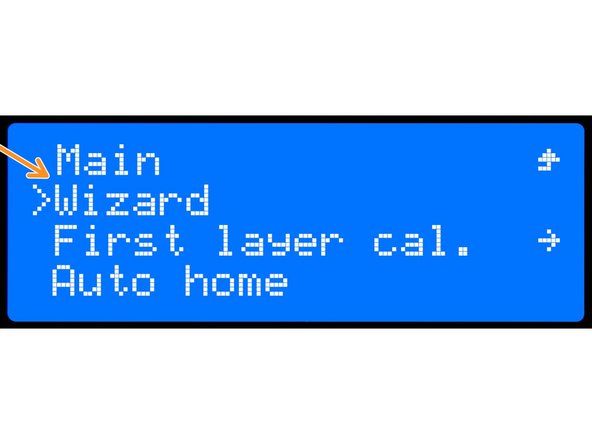
To check everything has been wired correctly and to calibrate the printer you need to run the wizard.
-
LCD Menu -> Calibration -> Wizard
-
If errors occur during selftest, please fix them before going further.
-
Follow the instructions displayed on the LCD screen.
-
-
-
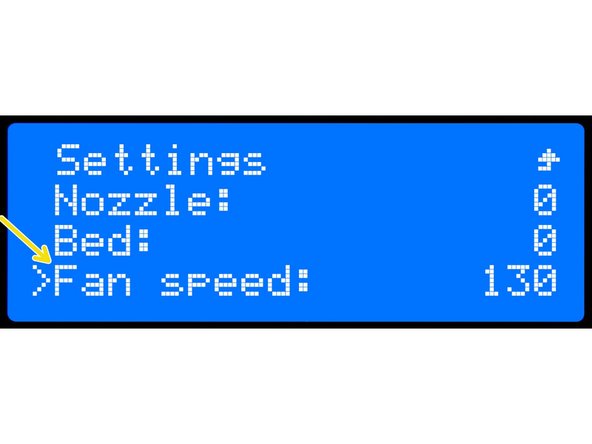
If you have installed a new extruder we recommend to calibrate the hotend PID. Otherwise you can skip this step.
-
In Settings -> Temperature -> Fan speed set the value that correspond to your most used slicer profile (min value = 0, max value = 255). For example, set 130 if you print lots of PETG and 255 if you print lots of PLA.
-
This is a little trick to make the PID calibration more reliable.
-
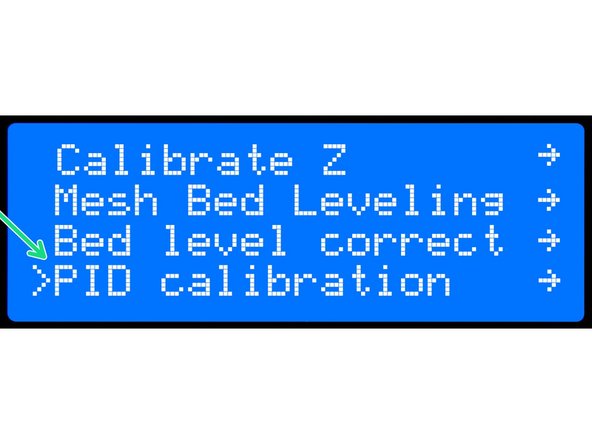
Run PID calibration in Calibration -> PID calibration.
-
Choose a temperature that matches your most used printing temperature.
-
With a new extruder you will need to recalibrate your extrusion multiplier (per spool). Follow our guide here: 8. Extrusion multiplier and filament diameter
-
-
-
Congratulations, you have finished! You can now relax and enjoy your new frame.
-
Happy printing :)
-