
-
-
This step is only needed because no custom firmware is available yet.
-
You can use the latest Bear Calibration firmware or the latest stock Prusa firmware.
-
Download gcode files using this link: https://github.com/gregsaun/bear_extrude...
-
Copy the following files to your SD card
-
bear_hemera_config_mk*.gcode(choose the version corresponding to your printer) -
This file is used only once to configure your printer to use the Bear Hemera. You can reset this configuration anytime by running the
reset_to_prusa_mk*.gcode -
unload_filament_hemera.gcode -
You have to use this file every time you want to unload filament from your Hemera. It is needed because the filament path is much shorter than Prusa extruder.
-
-
-
This step only needed because no custom firmware is available yet.
-
Insert the SD card in your printer with the Bear Hemera
-
In the menu of your printer select "Print from SD" and choose the file
bear_hemera_config_mk*.gcode. -
The printer might say it is an incomplete file but it is a wrong message, click to continue and print this file.
-
You can now delete the
bear_hemera_config_mk*.gcodefile from the SD card because it will not be used anymore.
-
-
-
From the printer's menu, disable the fan check with the menu Settings -> Fans check - On / Off
-
This is needed because the Hemera fan does not have a third wire to read the fan rotation
-
From the printer's menu, disable the filament sensor with the menu Settings -> Filament sensor - On / Off
-
As of today, the Bear Hemera does not have filament sensor, therefore it is better to disable it
-
-
-
From the printer's menu, run the PID calibration for your hotend with the menu Calibration -> PID calibration.
-
-
-
Raise the X axis to more than 30mm by pressing the LCD knob for longer than 3 seconds. Turn the knob to move up
-
Place a metallic object underneath the Pinda probe. The red light on the probe should turn off
-
If this test fails, do not attempt to print or use your printer. Carefully verify the wiring of your PINDA
-
The recent Prusa firmware allows you to check the value of the Pinda probe via the LCD menu Support -> Sensor info
-
-
-
From the printer's menu Settings -> Temperature -> Nozzle, set the nozzle temperature to 80°C
-
Return to the info screen (main screen)
-
Verify that the hotend fan is starting as soon as the temperature exceeds 50°C
-
Let the hotend cool down using the printer's menu Preheat -> Cooldown
-
If this test fails, do not attempt to print or use your printer. Carefully verify carefully the wiring of your hotend
-
-
-
From the printer's menu Settings -> Temperature -> Fan speed, set the fan speed to 130.
-
The nozzle fan (front fan) should now rotate at half speed.
-
If this test fails, do not attempt to print or use your printer. Carefully verify the wiring of your nozzle fan.
-
-
-
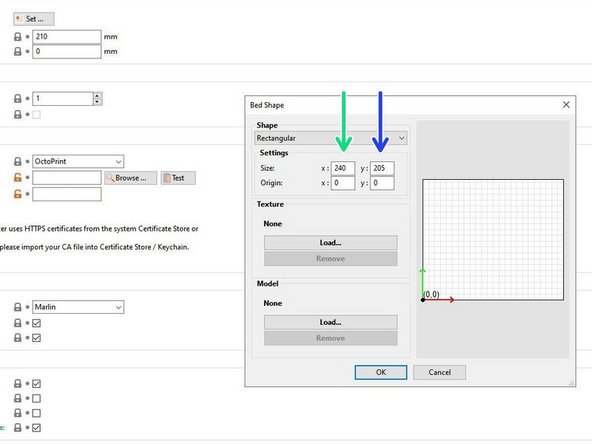
Open PrusaSlicer, go to Printer Settings -> General -> Size and coordinates, then click on the Set ... button
-
On the Bed Shape window, set the X size to 240
-
And Y size to 205
-
-
-
In PrusaSlicer, go to Printer Settings -> Extruder 1 and reduce the retraction length to 0.5mm for PETG and 0.3mm for PLA
-
These values are only a starting point and you will need to adjust them later according to your tuning
-
The Hemera has a much shorter filament path and efficient cooling tha original Prusa extruder. If your retraction is too long you might clog the Hemera
-
This setting might be overridden by your filament settings, make sure to check them
-
-
-
With the BearMera, the bed calibration and self test will fail and should not be executed.
-
Bed calibration fails because of the geometry of the extruder. The Pinda and the nozzle have different positions.
-
The self test will fail because of the E3D fan which does not have the rotation sensor. It will also fail because of the bed calibration.
-
The bed calibration could potentially crash the nozzle which would damage the bed surface.
-
-
-
Calibrate your first layer with the printer's menu Calibration -> First layer calibration.
-
The first layer calibration will remove the following message that could appears when you power on the printer: "Distance between tip of the nozzle and the bed surface has not been set yet. Please follow the manual, chapter First steps, section First layer calibration.".
-
It is possible that with the weight of the Hemera, the X axis is moving down on one side when the printer is off for some time. If this happens, move the X up until it crashes as explained in this step. Note that his can also happen to stock Prusa printer (and so stock Prusa extruder)
-
After calibrating your first layer, we recommend to set your extrusion multiplier according to our guide here: Extrusion multiplier and filament diameter
-
-
-
Congratulations, you have finished to install and calibrate your BearMera extruder.
-
Happy printing :)
-


Cancel: I did not complete this guide.
4 other people completed this guide.

3 Comments
Apologies if I'm missing a step here but running the MK2 with the provided bear_hemera_config_mk*.gcode and I am unable to perform the mesh bed leveling. The config file appears to create an offset that pushes the PINDA probe too far right on the X axis. Am I missing something? Thanks - Joey A.
Hi,
Thanks for the design, it looks great! There are some aspects that concern me.
-Is the printer able to find the 9 points needed for the auto bed mesh leveling?
-Is it possible to do XYZ calibration?
Thank you for your answer!
Tamas Kovach - Resolved on Release Reply
Is the printer able to find the 9 points needed for the auto bed mesh leveling?
Mesh bed leveling is working fine.
Is it possible to do XYZ calibration?
No this is not possible due to the different Pinda position. Some points cannot be mechanically reached.